Making a spirograph drawing into a t-shirt design with the ScanNCut

I did it again!
Two years ago I got my first two sets of wild gears and I had so much fun with it. Now, 2 years later I discovered there are new additions, so I made myself a big gift and ordered 3 more sets.

Again it was so special to unpack them.
This time I did not remove the brown protection paper, that I could clearly see which were my first sets and which are the new parts.
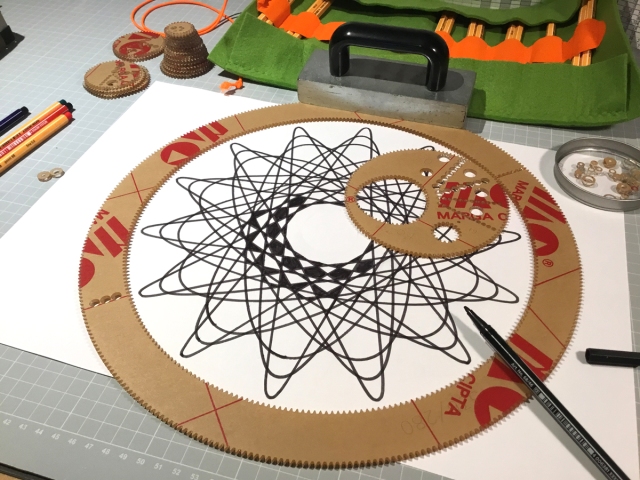
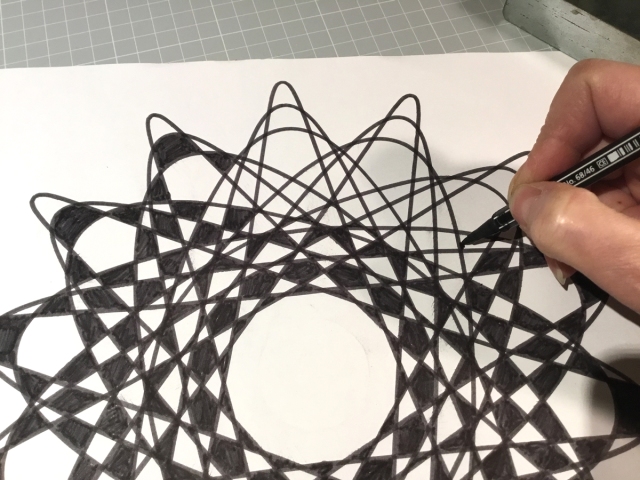
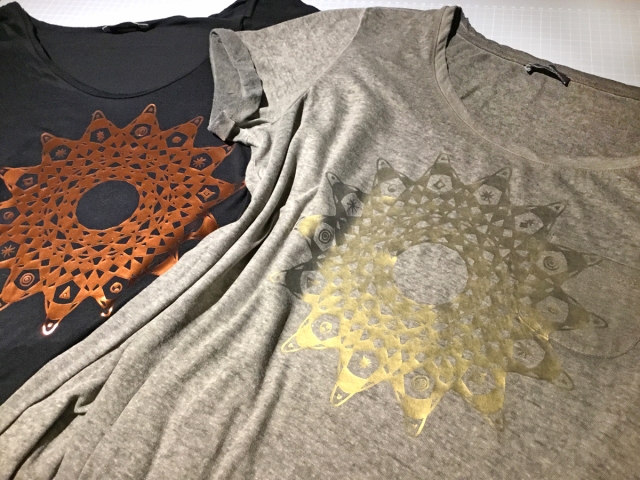
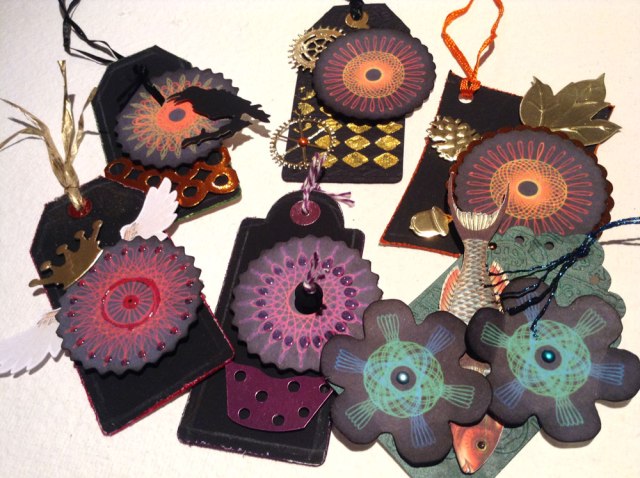
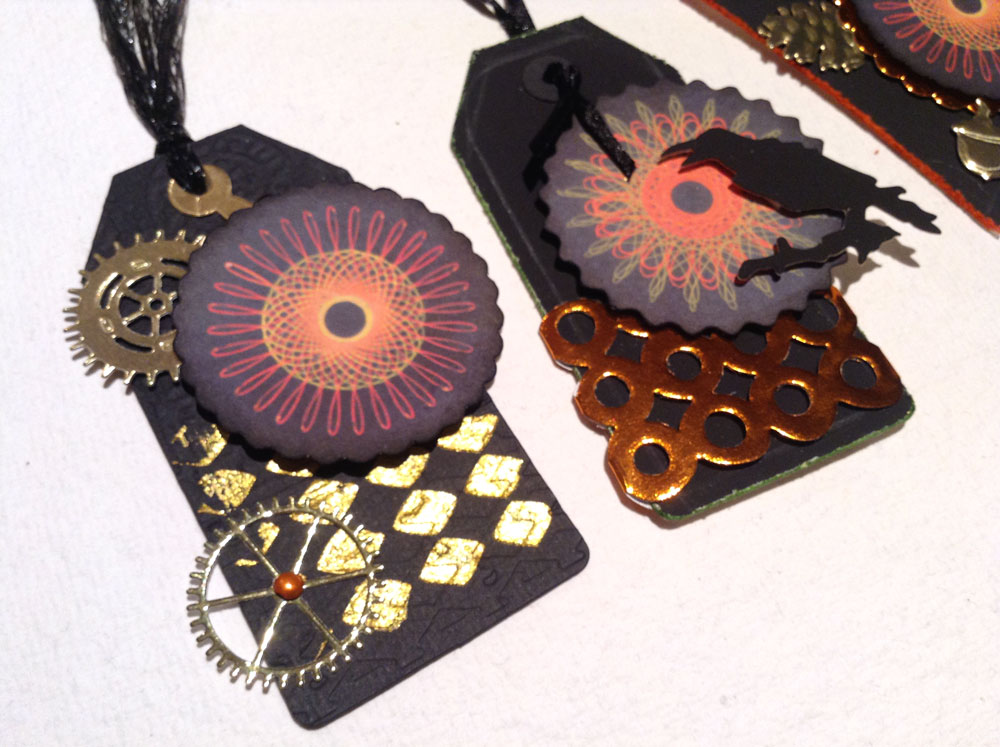
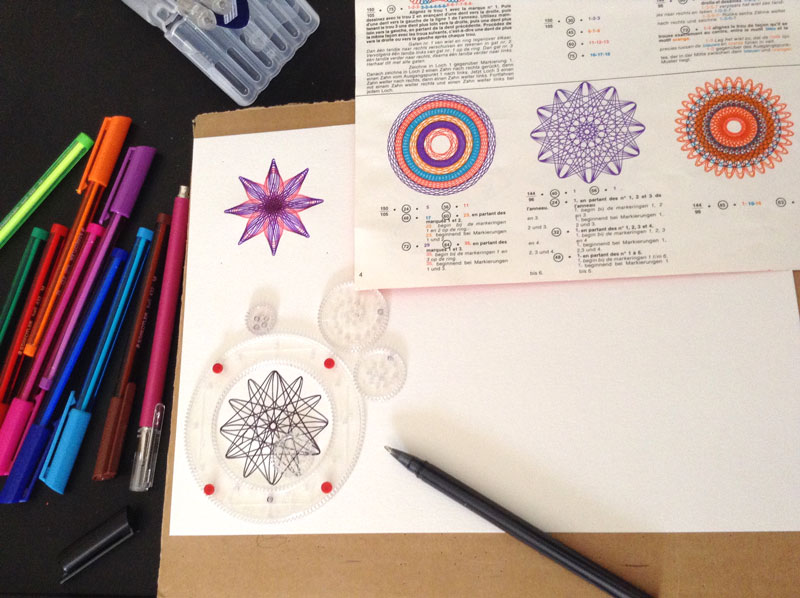
After some playing and trying I made a big ornament, that could be used as a t-shirt design.

What a fun to combine 3 very different techniques:

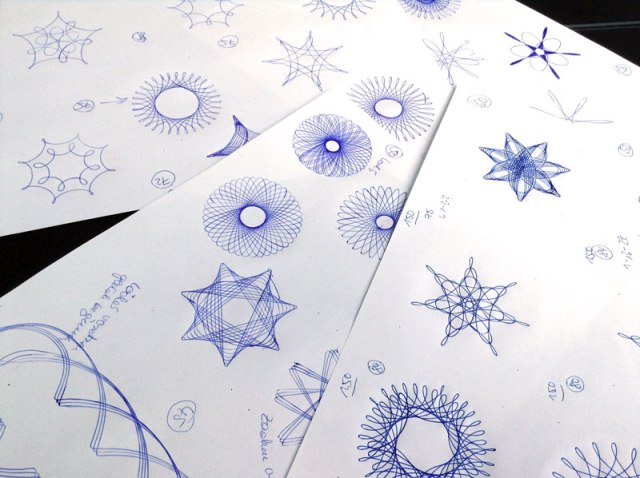
  • drawing with the spirograph
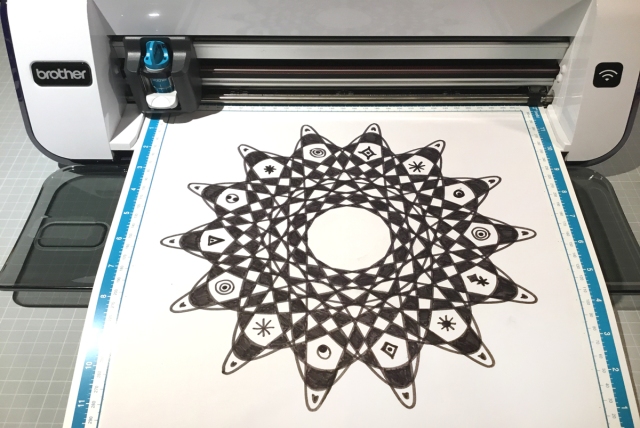
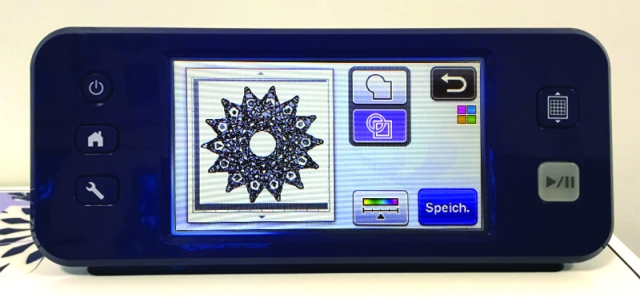
  • scanning and cutting with the ScanNCut
  • and ironing-on my own drawing on fabric

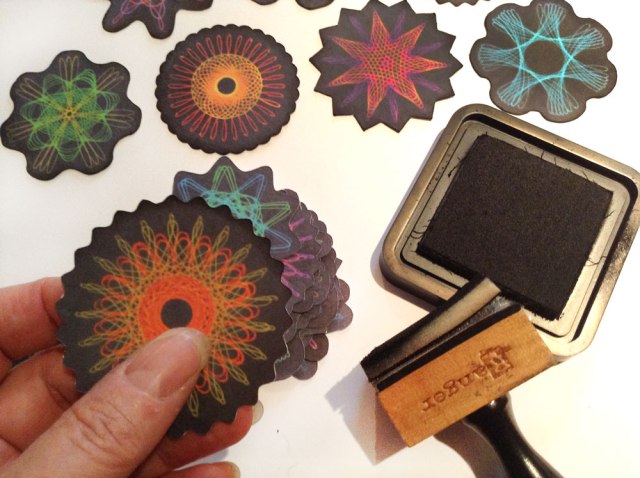
For the spirograph drawing I used a thick black Stabilo pen (68-series).
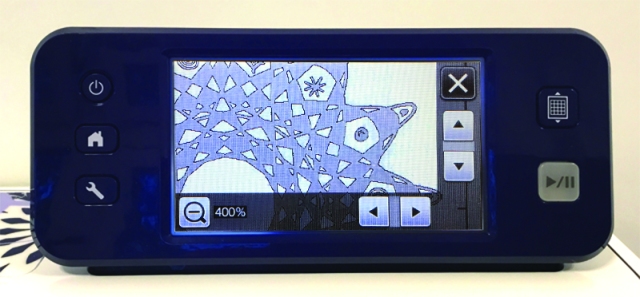
The contrasts and image quality were good enough for the built in scanner of the Brother ScanNCut to get all the lines and edges.
I scanned it and saved the data in the machine.

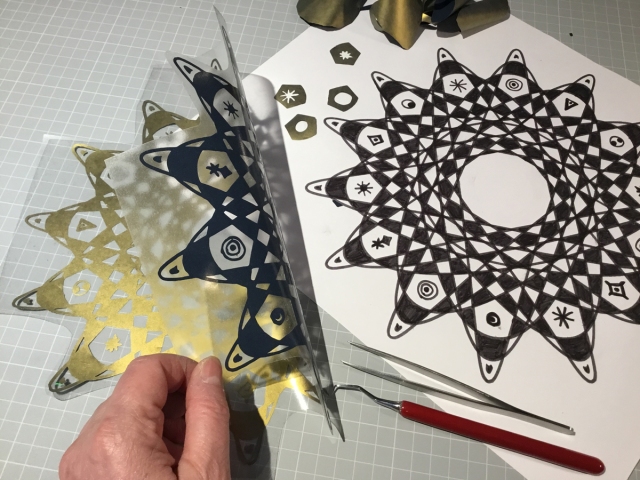
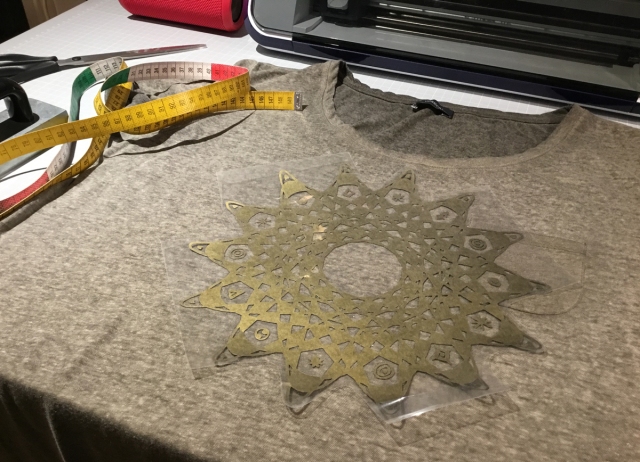
Then I chose gold metallic htv in full size, 12 x 12 in for cutting and after the result was great I just cut another one in copper.
Weeding was a job while watching TV. It took a while…

Lucky who got a heat press. 15 seconds pressing each and my new t-shirts were ready to wear.

Have a great weekend,

Angelika

wild-gears-spirograph1

wild-gears-spirograph2

wild-gears-spirograph3

wild-gears-spirograph4

wild-gears-spirograph5

spirograph-scanncut1 spirograph-scanncut2 spirograph-scanncut3

heattransfer-scanncut

heattransfer-scanncut1

heattransfer-scanncut2

heattransfer-scanncut3

A box full of wild gears…

It was my christmas wish and they are only to be ordered in USA from the designer himself.
We ordered them early, but the fantastic german post had my package forgotten in a corner for more than 3 weeks in Frankfurt.
Thanks to the USPS tracking system you can see every move of your package, but it can also make you completely crazy when there is NO movement, especially when you are lying there suffering from a heavy flu during and after the holidays…sigh.
Then weeks later somebody must have found it and put it into the right direction, so at last I could get the package from the local tax office paying 2.7 % tax, the huge amount of Euro 4,32…what a stupid effort to collect such a little amount, but well…

Anyway unpacking was such fun, to peel off the brown cover and get the thick clear acrylic gears.
Those who read more here might know what it is.
I am a big fan of the old spirograph drawing set from my childhood.
This is a grown up set designed by Aaron Bleackley, it is called Wild Gears and was a successful kickstarter project.

My love was generous enough to buy 2 big sets for me and after playing some days I LOVE them.
At the bottom you can see my first experiments with non-symmetrical shapes. These are a challenge and I love challenges.

Have fun to see me unpack and try them!
More will follow.

wildgears

wildgears1

wildgears2

wildgears3

wildgears4

wildgears5

wildgears6

wildgears7

wildgears8

wildgears9

wildgears10

Spirograph ornaments from the shaped wheels

2 days ago I received my spare parts Super Spirograph found on ebay USA and thanks to the seller, who delivered internationally. When I opened it there was a big WOW! It was packed in spirographic doodles paper! I LOVE the lid with the wheel chart inside. This is not what mine has which was produced in France once. They are not 100 % compatible, but almost, so with some extra tape and care it works to combine the parts.

The reason I bought it was mainly because there were also those shaped wheels added I didn’t have with my old Spirograph.

I couldn’t stop doodling anymore so the pics are not the best made in the middle of the night.
Here are some examples made with the eye wheel (my favorite) and with the triangle wheel. Scaled very small they are looking like snow flakes.

And my damaged Stabilo 88s are still good for drawing fillings. I have reordered these colors meanwhile and with less pressure they are working fantastic.

Have a great artsy weekend!

spare_parts

eye_shaped_wheel

6singleslittle_singles

Spirograph doilies circles flowers or however these little beauties are to be called…

So what am I going to do now with my little line art beauties?

First I scanned them, something you could not imagine 50 years ago when the spirograph was invented as a toy.
It is impossible to extract them from the white background so I had limited possibilities to add an other background in Photoshop.
Anyway with the blending mode to be found in the layer palette there were some choices. With “subtract”, “difference” and “exclusion” on a beige grungy texture I got very surprising dark effects. The colors of the line graphics changed, almost looked like neons. Perfect!
I played with the outlines/shapes to get different edges.

The prints were a bit pale, because I did not use glossy photo paper, but simple offwhite thick card stock. But I still loved them.
I cut them with my Silhouette Cameo.
Then I colored (as always) the white cutting edges with the edge blending tool which made them look much more interesting.
On some doilies I painted glossy dots with “Glossy Accents”.

And now comes the fun!

Of course you can use them as they are as gift tags. But I just love to make special gift tags and I always need many of them. So I played with the colors, mixed and matched, gave them wings and pearls, brads, gears, ribbon, a raven and a fish.

Have fun and I hope you’ll get some inspiration!

spirograph gift tags

spirograph art circles

printed_spiro_circles

spirograph_tags_making1

spirograph_tags_making

spirograph_tags1

spirograph_tags3spirograph_tags4


Playing with my old spirograph

While I went into vacation mode during August (urgently needed) I tried to stay away from the computer. But those who know me also know I just can’t stop fiddling and playing. So I took the time to find my old spirograph set from the attic.

I stumbled over it through Inkscape, which has a spirograph function and I just didn’t understand what it does and how it works.
So now I searched for the box with numerous plastic rings and wheels and I remembered how it worked very quickly even if it was ages ago.
Two parts are missing, but I am glad it’s only two you don’t necessarily need and it still works well.
Until the new colored ball point pens arrived I did a lot of tests with all the wheels with simple blue pens.

It was hard to find beautiful pens, but I got 2 different types from Staedtler with different line thicknesses. They have to dry fast, because the wheels cross the lines over and over again while drawing.

Impatient me often slipped from turning too quick, ruining the whole drawing, so this is really something to do accurate and slow.
After all it was a lot of fun. Lets see what I can do with all the lovely circles and shapes I made. I already scanned them for further use.

And now I understand the digital version, too, yeah! It is all about mathematics 🙂
Anyway I find the real drawings very charming with the dots and spots and irregular lines.

If you want to learn more about spirograph I found some great infos here:

SpiroGraphic Art

Have fun and if you stumble over one of those sets by chance, try it !

super-spirograph

spirograph-tests

spirograph-tests1

spirograph-circles

super-spirograph-tests3

super-spirograph-tests2